The Ultimate Guide To Deck Sealing: Protect And Preserve Your Outdoor Space
A well-maintained deck is a valuable extension of your living space, offering a perfect spot for relaxation, entertainment, and enjoying the outdoors. To keep your deck looking its best and extend its lifespan, sealing is a crucial step. This guide will walk you through the process of deck sealing, from preparation to application, ensuring you protect and preserve your outdoor space.
Why Seal Your Deck?
Protection Against the Elements
Decks are constantly exposed to harsh weather conditions, including sunlight, rain, snow, and temperature fluctuations. Over time, these elements can cause significant damage to the wood, leading to warping, cracking, and splintering. Sealing your deck creates a protective barrier that shields the wood from moisture, UV rays, and other environmental factors.
Preventing Mold and Mildew
Moisture is a deck's worst enemy, as it can lead to the growth of mold and mildew. These fungi not only mar the appearance of your deck but also compromise its structural integrity. A good deck sealant prevents water from penetrating the wood, reducing the risk of mold and mildew growth.
Enhancing Durability
Sealing your deck enhances its durability, making it more resistant to wear and tear. This is especially important in high-traffic areas where the wood is subjected to constant foot traffic, furniture movement, and other stresses. A well-sealed deck can withstand these challenges and remain in good condition for years.
Choosing the Right Deck Sealant

Types of Deck Sealants
There are several types of deck sealants available, each with its own benefits and drawbacks. The most common types include:
- Clear Sealants: These provide a transparent finish that allows the natural beauty of the wood to shine through. Clear sealants offer excellent protection against moisture and UV rays but may require more frequent reapplication.
- Semi-Transparent Stains: These sealants offer a hint of color while still allowing the wood grain to show. They provide good protection against the elements and can enhance the aesthetic appeal of your deck.
- Solid Stains: These provide a more opaque finish, covering the wood grain completely. Solid stains offer the highest level of UV protection and are ideal for older decks with imperfections.
Factors to Consider
When choosing a deck sealant, consider the following factors:
- Wood Type: Different types of wood have varying levels of porosity and natural resistance to the elements. Choose a sealant that is compatible with your deck's wood type.
- Climate: The climate in your area plays a significant role in determining the best sealant for your deck. In regions with high humidity or frequent rainfall, opt for a sealant with strong water-repellent properties.
- Maintenance: Some sealants require more frequent maintenance than others. Consider how much time and effort you are willing to invest in maintaining your deck.
Preparing Your Deck for Sealing
Cleaning the Deck
Thoroughly clean your deck by sweeping away debris, scrubbing with a deck cleaner, and rinsing it off. Allow the deck to dry completely, which usually takes 24 to 48 hours. Inspect and repair any damage, such as tightening loose fasteners, sanding rough spots, and filling cracks or holes. Proper preparation ensures a smooth and even application of the sealant.

Repairing Damage
Inspect your deck for any signs of damage, such as loose boards or protruding nails. Tighten or replace loose fasteners to ensure all boards are securely attached. Sand rough spots to smooth out splintered areas and use wood filler to repair cracks or holes. Properly addressing these issues will create a solid foundation for sealing.
Applying the Deck Sealant
Tools and Materials
To seal your deck, gather essential tools and materials: a deck sealant, a paint tray and liner, a paint roller with an extension pole, and a paintbrush. Additionally, have painter's tape and drop cloths or plastic sheeting to protect surrounding areas. Ensure you also have a stir stick for the sealant and appropriate protective gear like gloves and safety glasses. These items will help you achieve a smooth and even application.
Step-by-Step Application
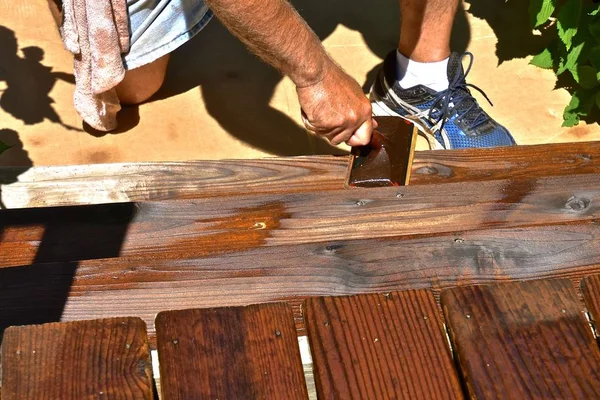
Begin by protecting surrounding areas with painter's tape and drop cloths. Stir the sealant thoroughly and pour it into a paint tray. Use a paint roller with an extension pole to apply an even coat of sealant to the deck, working in small sections and following the wood grain. Finish by using a paintbrush for edges and corners, then allow the sealant to dry according to the manufacturer's instructions.
Maintaining Your Sealed Deck
Regular Cleaning
To keep your deck in top condition, clean it regularly. Sweep away debris, and periodically wash the surface with a mild detergent and water. Avoid using harsh chemicals or power washers, as these can damage the sealant.
Reapplying Sealant
Even the best sealants will wear down over time, especially in high-traffic areas. Plan to reapply sealant every 1 to 3 years, depending on the type of sealant used and the wear and tear on your deck. Regularly inspect your deck for signs of wear, such as fading, cracking, or water absorption.
Hawthorn VIC, Australia
Phone: 180-0332-525

